【Hexo博客】在主页展示GitHub贡献度日历,使用GitHub当api
【引言】展示的Github贡献日历分为前端和后端
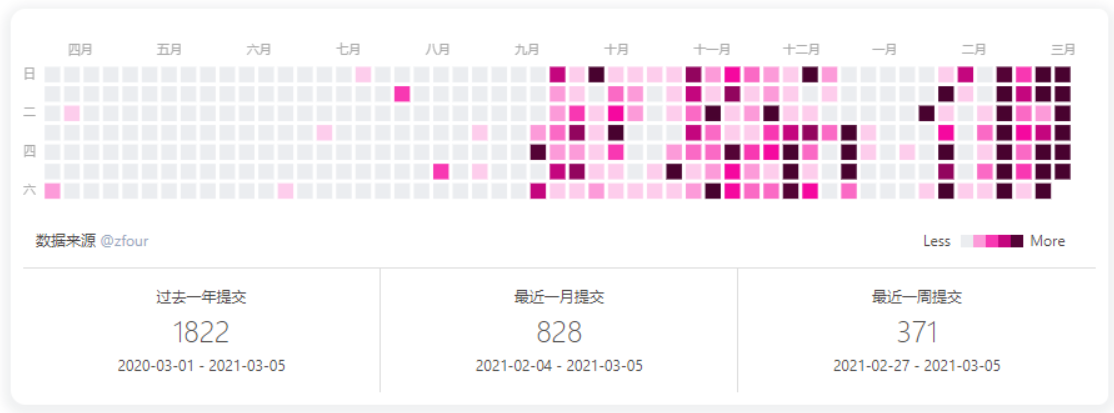
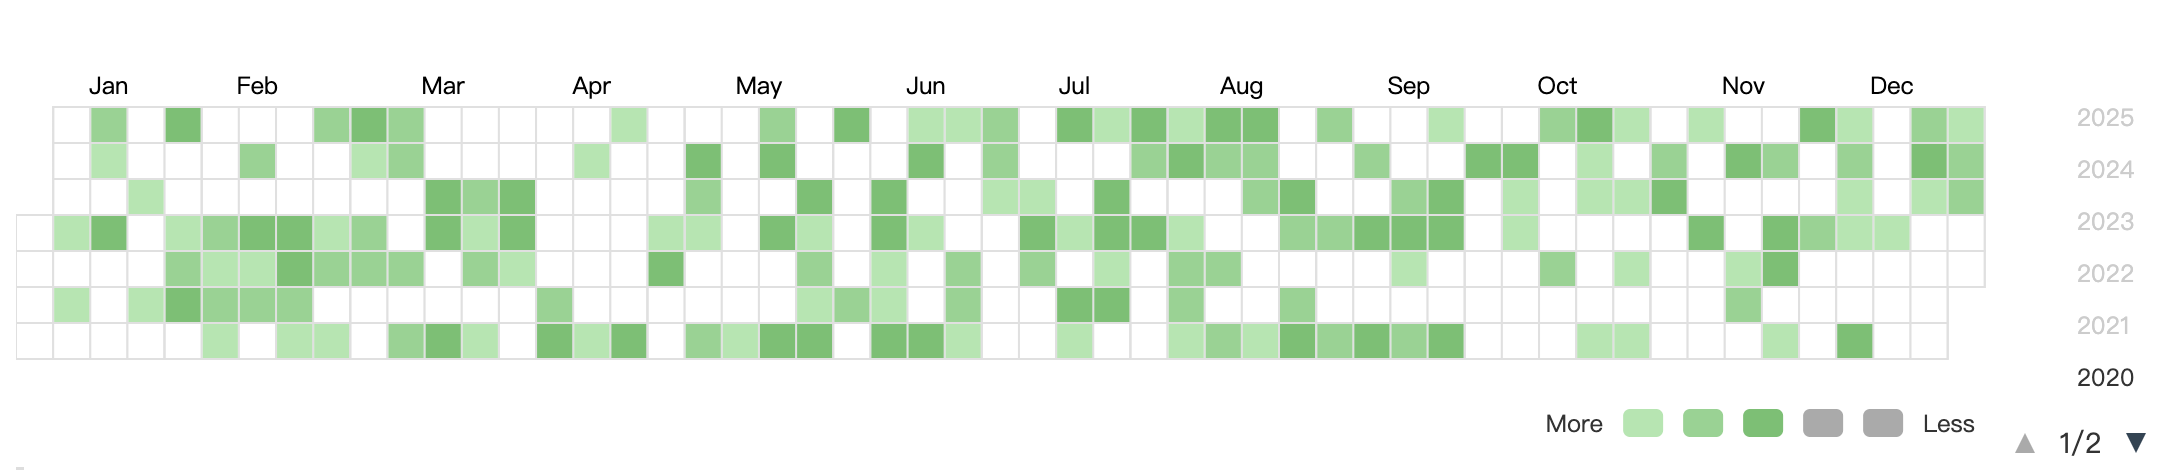
在博客上主页显示的效果是这样的
在hexo文件夹下运行下面代码
npm i hexo-githubcalendar --save |
注意,一定要加--save,不然本地预览的时候可能不会显示!!!
第二步
修改hexo根目录下的_config.yml文件,这是我的模板,根据需要修改,在文件末尾插入即可
githubcalendar: |
[!TIP]
hexo_githubcalendar.js请将该文件保存在本地当中!路径为
Hexo\themes\你的主题名字(默认landscape)\source\js
我看了很多关于博主的文章都是说申请个自己的api或者跑云端脚本,但是大家都忽略了一件事!
Github可以跑Action!!!
Github可以跑Action!!!
Github可以跑Action!!!
我们只需要弄一个库就可以跑Action了
开始实践
首先需要一个Github账号!
创建一个任意的库!然后git clone 库到本地!
上传文件
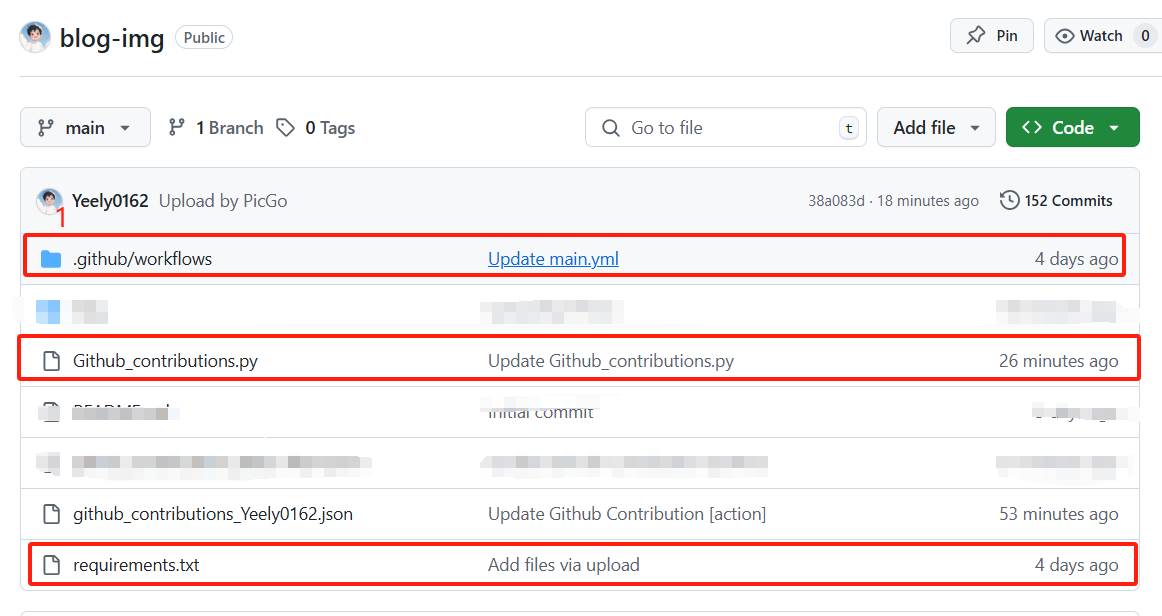
上传图中三个部分的内容
-
.github/workflows目录下放main.yml文件
[!NOTE]
请自己创立文件夹和保存相关文件,代码
main.yml文件内容如下
name: Update GitHub Contributions #不喜欢这个名字可以自己Custom |
上传
Github_contributions.py文件[!NOTE]
请自行修改里面的ID参数修改成自己的ID号码
# -*- coding: UTF-8 -*-
import requests
import re
from http.server import BaseHTTPRequestHandler
import json

def list_split(items, n):
    return [items[i:i + n] for i in range(0, len(items), n)]
def getdata(name):

    # 2024-03-29 定义 headers 请求头
    # 请见 https://github.com/yuhengwei2001/python_github_calendar_api/commit/0f37cfc003f09e99a1892602d8bc2b38137899d2#diff-b014e93fcab9bae29f453d7a616da5eac2f02947f32d02a1a1bf200eeaab5a39L11
    headers = {
        'Referer': 'https://github.com/'+ name,
        'Sec-Ch-Ua': '"Chromium";v="122", "Not(A:Brand";v="24", "Microsoft Edge";v="122"',
        'Sec-Ch-Ua-Mobile': '?0',
        'Sec-Ch-Ua-Platform': '"Windows"',
        'Sec-Fetch-Dest': 'empty',
        'Sec-Fetch-Mode': 'cors',
        'Sec-Fetch-Site': 'same-origin',
        'User-Agent': 'Mozilla/5.0 (Windows NT 10.0; Win64; x64) AppleWebKit/537.36 (KHTML, like Gecko) Chrome/122.0.0.0 Safari/537.36 Edg/122.0.0.0',
        'X-Requested-With': 'XMLHttpRequest'
    }
    # 发送请求时添加 headers 请求头
    # gitpage = requests.get("https://github.com/" + name)
    gitpage = requests.get("https://github.com/" + name  + "?action=show&controller=profiles&tab=contributions&user_id="+ name, headers=headers)
    data = gitpage.text

    # 2023-11-22 更新正则 https://github.com/Zfour/python_github_calendar_api/issues/18
    datadatereg = re.compile(r'data-date="(.*?)" id="contribution-day-component')
    datacountreg = re.compile(r'<tool-tip .*?class="sr-only position-absolute">(.*?) contribution')

    datadate = datadatereg.findall(data)
    datacount = datacountreg.findall(data)
    datacount = list(map(int, [0 if i == "No" else i for i in datacount]))

    # 检查datadate和datacount是否为空
    if not datadate or not datacount:
        # 处理空数据情况
        return {"total": 0, "contributions": []}

    # 将datadate和datacount按照字典序排序
    sorted_data = sorted(zip(datadate, datacount))
    datadate, datacount = zip(*sorted_data)

    contributions = sum(datacount)
    datalist = []
    for index, item in enumerate(datadate):
        itemlist = {"date": item, "count": datacount[index]}
        datalist.append(itemlist)
    datalistsplit = list_split(datalist, 7)
    returndata = {
        "total": contributions,
        "contributions": datalistsplit
    }
    return returndata
class handler(BaseHTTPRequestHandler):
    def do_GET(self):
        # 2024-03-15 规范接口的传参方式 https://github.com/Zfour/python_github_calendar_api/issues/20#issuecomment-1999115747
        path = self.path
        spl=path.split('?')[1:]
        for kv in spl:
            key,user=kv.split("=")
            if key=="user": break
        data = getdata(user)
        self.send_response(200)
        self.send_header('Access-Control-Allow-Origin', '*')
        self.send_header('Content-type', 'application/json')
        self.end_headers()
        self.wfile.write(json.dumps(data).encode('utf-8'))
        return
if __name__ == "__main__":
    # 方式1:直接指定用户名 !!!!!!!!!!!!!!!!Custom here!!!!!!!!!!!!!!!!!!!!!!!!!!!!!!!!!!!!!!
    username = "Github user name"  # 替换为实际的GitHub用户名
    #!!!!!!!!!!!!!!!!!!!!!!!!!!!!!!!!!!!Custom here!!!!!!!!!!!!!!!!!!!!!!!!!!!!!!!!!!!!!!

    print(f"正在获取 {username} 的贡献数据...")
    data = getdata(username)

    # 保存到JSON文件
    filename = f"github_contributions_{username}.json"
    with open(filename, 'w', encoding='utf-8') as f:
        json.dump(data, f, ensure_ascii=False, indent=2)

    print(f"数据已保存到 {filename}")
    print(f"总贡献数: {data['total']}")
还有
requirements.txt文件
certifi==2020.12.5 |
上述操作完成即可运行Action!


等待运行完成就可以啦!
根据自己的实际路径自定义获取json的URL,然后粘贴到上述配置_config->githubcalendar(函数)->api即可
获取到的内容如下


Invitation
Yeely
Yeelys
created:03/07/2022
Welcome to Yeelyhome
Use this card to join the candyhome and participate in a pleasant discussion together .
Welcome to Yeely's candyhome,wish you a nice day .
本博客所有文章除特别声明外,均采用 CC BY-NC-SA 4.0 许可协议。转载请注明来自 Yeely!
 微信
微信- 支付宝


评论